|
Getting your Trinity Audio player ready...
|
Supervisor Password
Default supervisor password is 01483.
The Supervisor password is designed to limit access to the Supervisor functions (such as the Supervisor Menus, or Refund transactions) on the terminal to those who have access to the code.
Your terminal is shipped with an initial default code of 01483, but is configured so that a change of this code is required before you process any transactions. If you forget your code, please contact the terminal Helpdesk who will be able to reset the code back to the default.
Note: The following codes are not valid choices for your Supervisor password: 01483, 1234, 0000, or 9999. Any other numerical code of four or more digits will be a valid Supervisor password. The Supervisor password allows entry into the Refund option on the terminal.
To change your Supervisor password press the menu key twice, then choose SUPERVISOR from the list. You will be asked to type your current supervisor password (i.e. 01483), then press the green key, choose PASSWORD then CHANGE PWD.
You will need to enter your new numerical code (4 digits or more) twice, pressing the green key after each input, before the Supervisor password is updated to this new value.
Note: If your terminal is lost or stolen you should contact the terminal Helpdesk immediately.
You are strongly advised to ensure that privileged access to your terminal (including access to the Supervisor password) is only granted to staff that have been independently verified as being trustworthy.
Supervisor Password Change – Initial Transaction
If you have not changed the Supervisor password before you process your first transaction the terminal will prompt you to change the code from the default during the transaction.
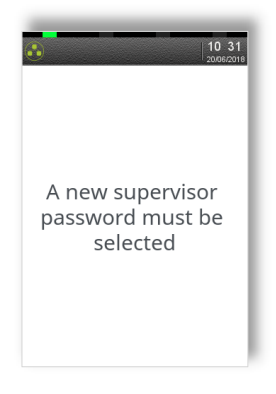
1. During the transaction, you will be prompted that the code needs to be changed, press any key to continue.
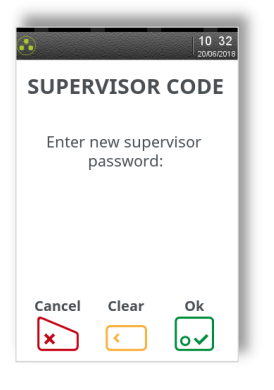
2. Enter a new code and press the green key.
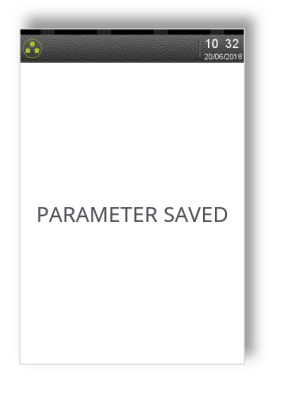
3. Re-enter the new code and press the green key. A confirmation will be shown if the two entries match and the code has been changed.
The terminal will continue as normal, refer to the instructions for transaction type that you chose to complete the transaction.
Refund Password
Your terminal is configured to use the Supervisor password to protect both the Refund and the Supervisor functions. If you would like a separate code enabled in order to protect the Refund function please contact the terminal Helpdesk.
This feature could be used to allow one member of staff the added ability to perform a Refund; while allowing another member(s) of staff the ability to perform the Supervisor functions.
Supervisor Menus
The Supervisor menus allow access to various management functions in your terminal. To be able to access the Supervisor menu, you must use the Supervisor password.
To access the Supervisor menus press the menu key twice, then choose SUPERVISOR and press the green key. You will be asked to type your current supervisor password, and confirm this by pressing the green key.
Once you have access to the Supervisor menus, press the menu key to cycle through the various menu screens.
The following shows a summary of the Supervisor functions and how to access them, and what they do.
Note: Some Supervisor functions MUST only be used when instructed to do so by the terminal Helpdesk.
First Supervisor Menu Screen
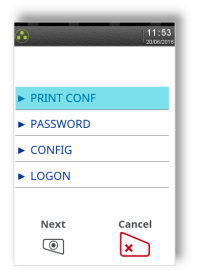
PRINT CONF – Allows the terminal to print the configuration of any additional apps installed i.e. TruRating
PASSWORD – Allows the various codes in the terminal to be reset or changed. Enters the PASSWORD menu – see next section.
CONFIG – Allows the access to various extended configuration options. Enters the CONFIG menu – see next section.
LOGON – Allows the terminal to perform a test with some, or all, of the acquirers loaded on the terminal. Do not use this feature unless instructed to do so by the terminal Helpdesk.
Second Supervisor Menu Screen (press menu once)
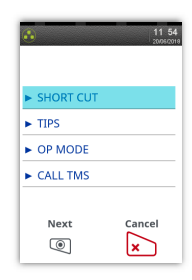
SHORT CUT – Allows access to advanced configuration options. Enters the SHORT CUT menu – see next section.
TIPS – Allows the Gratuity/Tip mode to be switched on and off. Setting TIPS to ON, sets OP MODE to LATE.
OP MODE – Allows the setting of when the terminal will contact the acquirer for authorisation during the transaction. Gratuity/Tip mode is only available in LATE mode. Setting OP MODE to EARLY, sets TIPS to OFF.
CALL TMS – Immediately sets off a configuration data call to the Terminal Management System (TMS). Do not use this feature unless instructed to do so by the terminal Helpdesk.
Third Supervisor Menu Screen (press menu twice)
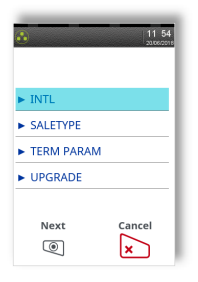
INTL – Allows the international dialling code to be set. Do not use this feature unless instructed to do so by the terminal Helpdesk.
SALETYPE – Allows the default transaction type to be set, so the transaction type will begin as soon as a card is swiped or inserted from the idle screen. If REFUND is set then the Supervisor password check will not be done.
TERM PARAM – Allows the setting of internal terminal options. Do not use this feature unless instructed to do so by the terminal Helpdesk.
UPGRADE – Immediately sets off a software upgrade call to the Terminal Management System (TMS). Do not use this feature unless instructed to do so by the terminal Helpdesk.
Fourth Supervisor Menu Screen (press menu three times)
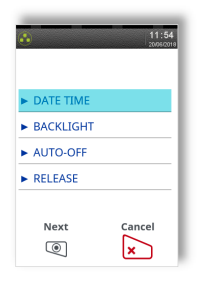
DATE TIME – Allows the date and time to be set. The date and time is automatically updated when a successful TMS call is made.
BACKLIGHT – Allows the setting of the time taken after a key is pressed before the backlight turns off.
AUTO-OFF – Allows the setting of the time taken after a key is pressed before the terminal enters power save mode.
RELEASE – Prints a summary report of software versions loaded on the terminal. Do not use this feature unless instructed to do so by the terminal Helpdesk.
Supervisor Sub-Menus
There are three Supervisor sub-menus. They are the Password menu, the Config menu and the Shortcut menu. They allow access to extended options within the Supervisor menus.
To access the Password menu press the menu key twice, then choose SUPERVISOR and press the green key. You will be asked to type your current supervisor password, and confirm this by pressing the green key, and choose PASSWORD.
Below is a summary of the functions within the Password menu and how to access them, and what they do.
Note: Some Supervisor functions MUST only be used when instructed to do so by the terminal Helpdesk.
Password Menu Screen
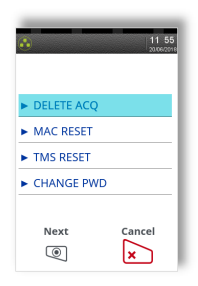
DELETE ACQ – Deletes all datasets for one or all acquirers from the terminals memory. Do not use this feature unless instructed to do so by the terminal Helpdesk.
MAC RESET – Allows the Message Authentication Code (MAC) key to be reset to the initial value for one or all acquirers. Do not use this feature unless instructed to do so by the terminal Helpdesk.
TMS RESET – Allows the secure code used for communications to the TMS to be reset to the initial value. Do not use this feature unless instructed to do so by the terminal Helpdesk.
CHANGE PWD – Allows the Supervisor password (and/or Refund code) to be changed. The new code must be used for all future code requests.
To access the Config menu press the menu key twice, then choose SUPERVISOR and press the green key. You will be asked to type your current supervisor password, and confirm this by pressing the green key, and choose CONFIG.
Below is a summary of the functions within the Config menu and how to access them, and what they do.
Note: Some Supervisor functions MUST only be used when instructed to do so by the terminal Helpdesk.
First Config Menu Screen
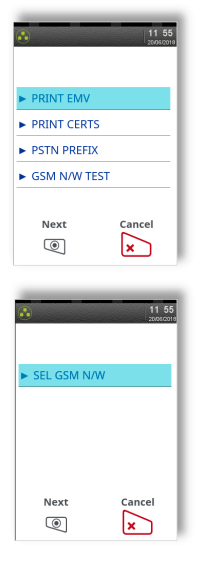
PRINT EMV – Prints EMV data loaded on the terminal. Do not use this feature unless instructed to do so by the terminal Helpdesk.
PRINT CERTS – Prints Certificates loaded on the terminal. Do not use this feature unless instructed to do so by the terminal Helpdesk.
PSTN PREFIX – Allows the telephone network (PSTN) prefix number to be set.
GSM N/W TEST – Prints a rolling data sheet of the mobile network. Do not use this feature unless instructed to do so by the terminal Helpdesk.
SEL GSM N/W – Allow the selection of a different mobile network. Do not use this feature unless instructed to do so by the terminal Helpdesk.
To access the Shortcut menu press the menu key twice, then choose SUPERVISOR and press the green key you will be asked to type your current supervisor password, and confirm this by pressing the green key. Press the menu key and choose SHORT CUT.
Below is a summary of the functions within the Shortcut menu, how to access them and what they do.
Note: Some Supervisor functions MUST only be used when instructed to do so by the terminal Helpdesk.
Shortcut Menu Screen
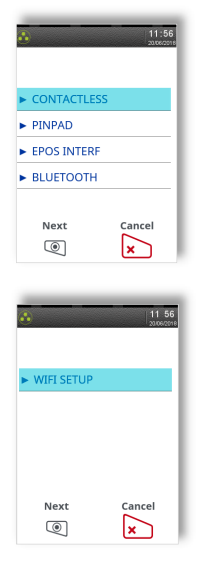
CONTACTLESS – Configures the internal/external Contactless Reader support. Do not use this feature unless instructed to do so by the terminal Helpdesk.
PINPAD – Configures the external PINPad support. Do not use this feature unless instructed to do so by the terminal Helpdesk.
EPOS INTERF – Configures the EPoS (till) Interface functionality. Do not use this feature unless instructed to do so by the terminal Helpdesk.
BLUETOOTH – Allows the terminal to be associated to a Bluetooth base. Do not use this feature unless instructed to do so by the terminal Helpdesk.
WIFI SETUP – Configures the Wi-Fi network. Do not use this feature unless instructed to do so by the terminal Helpdesk.
