|
Getting your Trinity Audio player ready...
|
Getting Started
Set up your base unit in a convenient location close to a power source and an Ethernet socket.
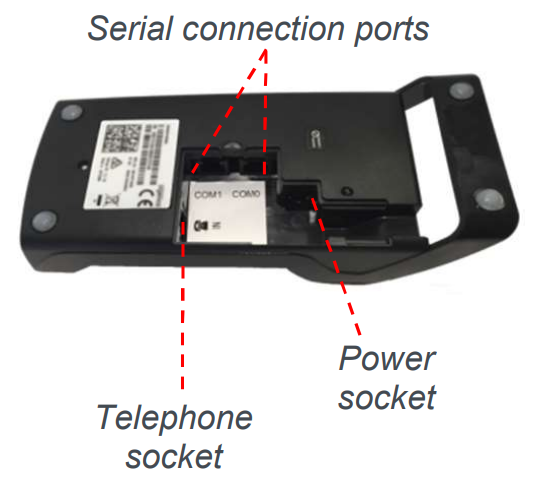
To connect the Ethernet cable, connect one side to your Ethernet socket or router and the other side to the socket located on the rear of your base unit.
To connect the base unit to a telephone point, remove the back panel as shown in the diagram. Connect one end of the telephone cable to the modem socket on your base unit.
Connectivity
The Move 5000 is a Multi-Comms terminal meaning you can connect via Ethernet, Mobile Network or WiFi/Bluetooth.
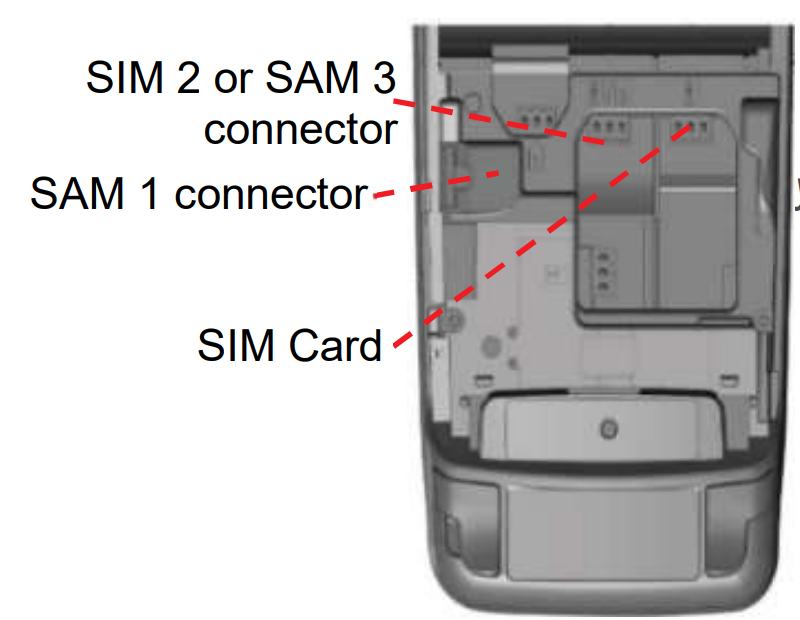
To setup a mobile connection on the terminal, you simply need to insert the SIM card into the back of the Terminal and reboot using the dot key and yellow key.
Function Keys
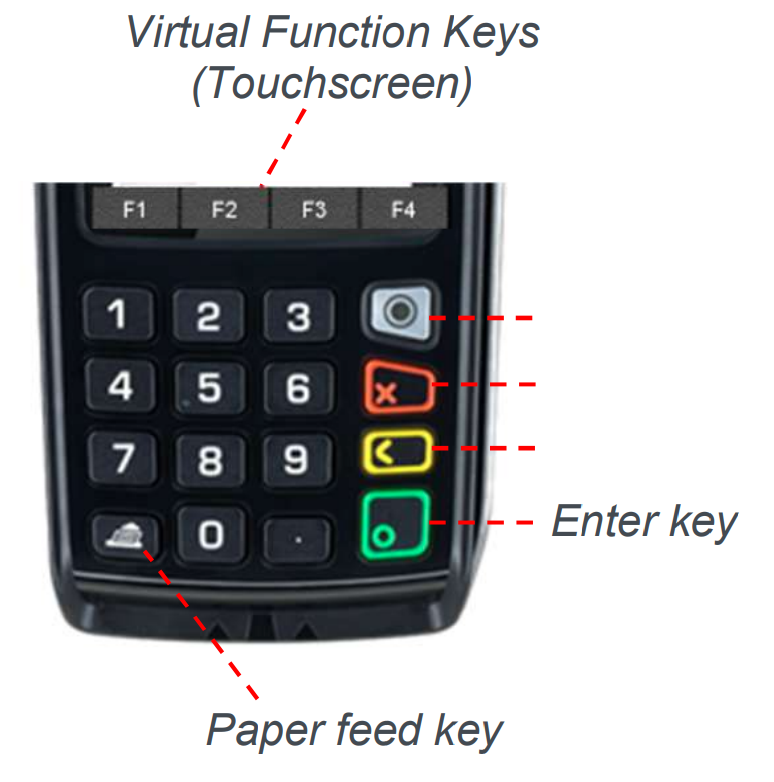
Virtual Function Keys: These appear on the Touchscreen interface when they may be used as shortcuts eg. F1 to print a duplicate receipt.
Menu key: To enter the application menus press the Menu key from the idle (READY) screen. Pressing the key again moves to the next menu (if available).
Correction keys: When entering numbers or letters, the yellow key deletes one character at a time; while the red key deletes the entire line (this key also cancels transactions).
Confirmation key: The green key is used to confirm anything that has been typed into the terminal.
Paper feed key: To test the feeding of the paper through the printer press and hold the paper feed key.
Bluetooth Base Setup
Bluetooth terminals should already be paired with the base unit provided; your terminal can only use the telephone and Ethernet connections when it is paired to the base unit.
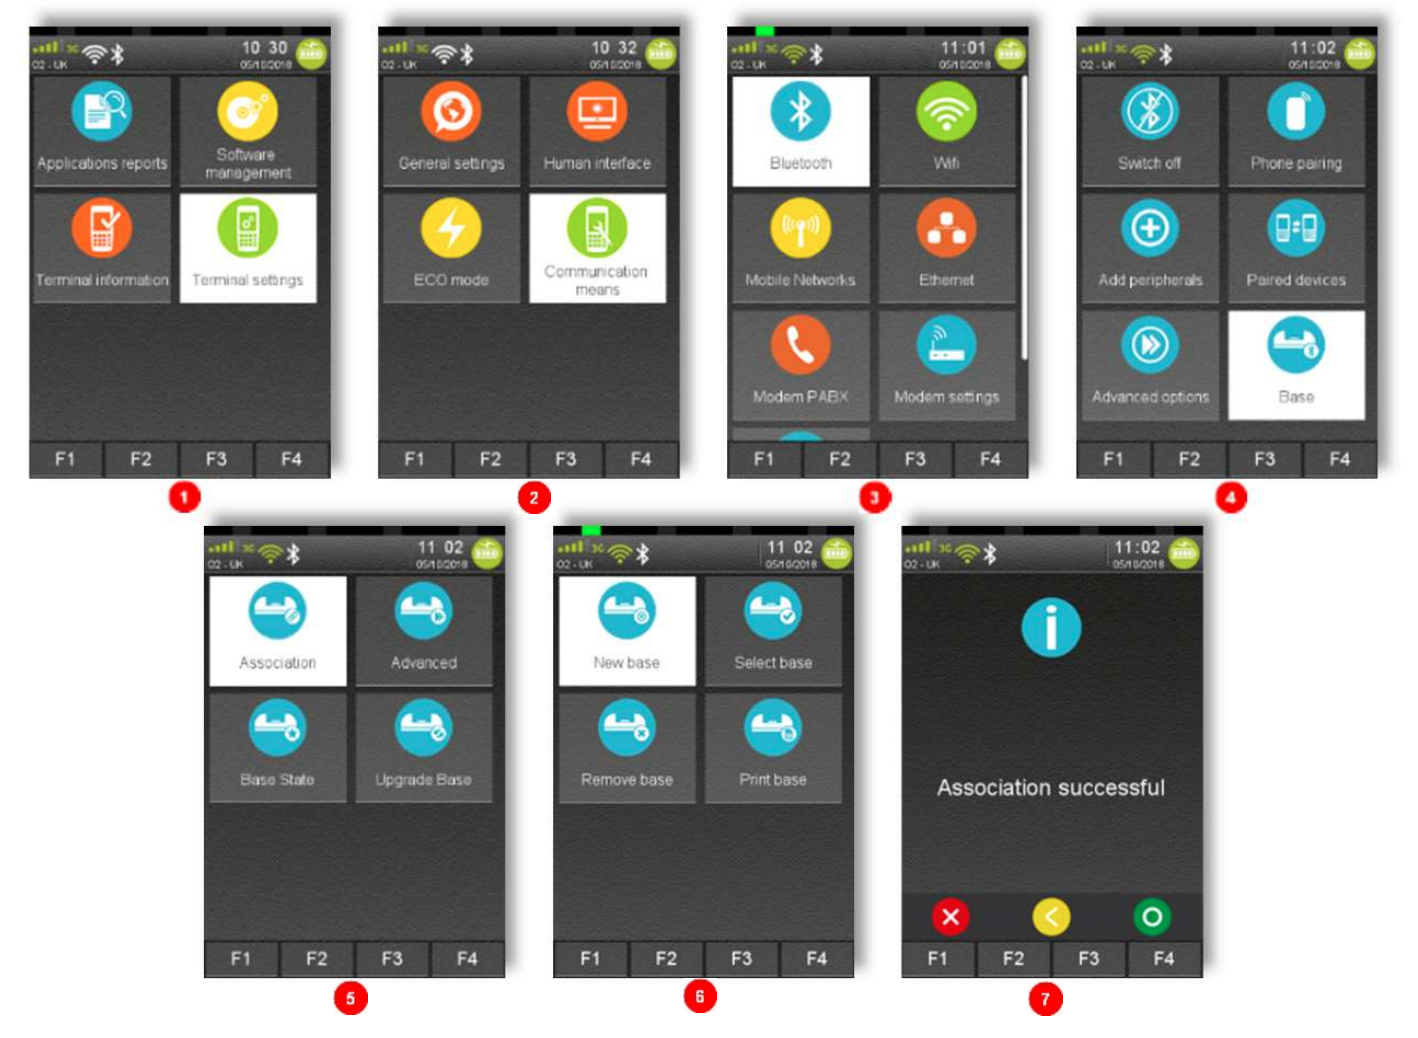
To associate your terminal to a Bluetooth base go to Terminal Control panel by pressing F3 key on the ‘Ready’ screen, then select as follows: ‘Control Panel’, ‘Terminal Settings’, ‘Communication means’, ‘Bluetooth’.
Once in Bluetooth configuration select ‘Base’, ‘Association’ and ‘New Base’.
Please find the full process shown below:
WIFI Setup
To connect to WiFi, press F3 and then select ‘Control Panel’. Then select ‘Terminal settings’ ‘Communication Means’, ‘WiFi’, ‘Scan Networks’, ‘Choose your selected Network’, ‘Enter Password’.
The terminal will connect to the WiFi and the icon should turn green.
Follow the steps shown in the images to choose a network.

The terminal will connect to the WIFI and the icon will turn green 
For security reasons the Wi-Fi network has to comply with the PCI DSS v2 Wireless Guidance.
The Wi-Fi service will refuse to create profiles for unsecure network (open or WEP
networks).
Please note: login via landing pages is not supported (For networks which require
login via web page)
Once all 3 are methods are connected, you will then see them enabled (green) in the bar below:

Supervisor Password
The default supervisor password is 01483.
Please note: The terminal will require you to change this to a new code of your choosing before you can process any transactions.
The Chip Card Reader
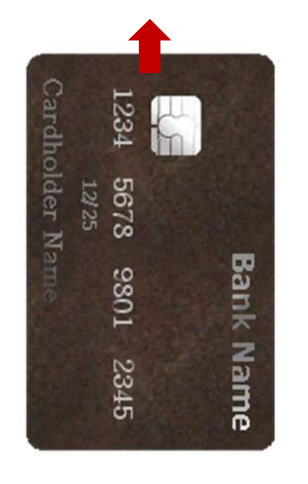
Customer cards must be inserted as shown, with the chip upwards.
Push the card fully into the slot below the keypad and follow the instructions on screen.
If you see a “BAD READ” message, check the card orientation and try again. After three bad reads the terminal will prompt you to swipe the card.
DO NOT remove the card until instructed to do so by the terminal.
Chip and Pin Transactions – Sale
From the idle screen, insert the customer’s card into the card reader.
Enter the sale amount for the transaction and press the green key.
For example enter £12.34 as 1234.
The customer must enter their PIN code.
NEVER ASK THE CUSTOMER TO DIVULGE THEIR PIN CODE.
After the customer has entered their PIN and pressed green key they will be prompted to return the terminal to you.
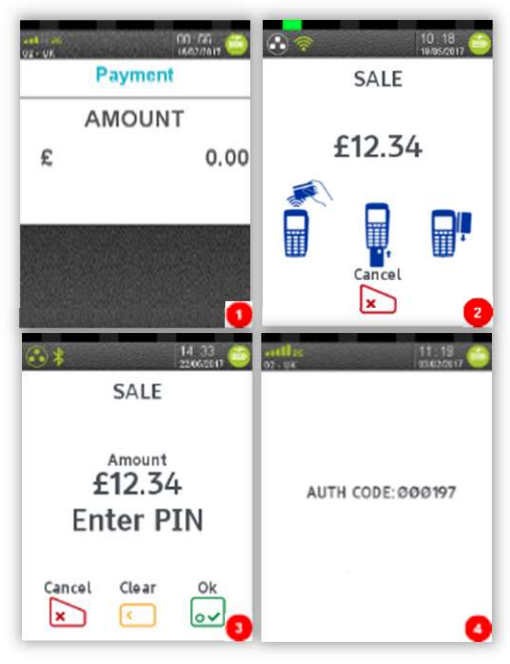
The terminal will now connect to the acquirer for authorisation, if the transaction is authorised then an “AUTH CODE” will be shown.
The terminal will print two receipts. The merchant copy will be printed first, then once you press the green key, the customer copy will be printed.
Chip and Pin Transactions – Refund
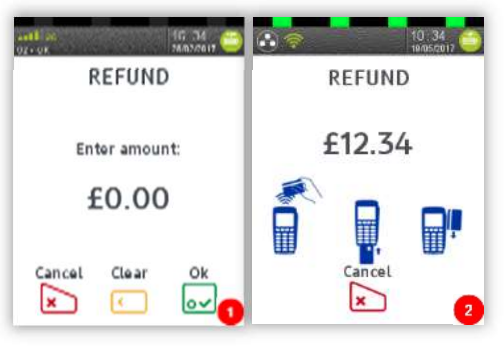
From the idle screen, press menu, then choose “REFUND”. Enter the Supervisor password and confirm with green key. Now insert the customer’s card into the card reader. Enter the refund amount for the transaction and press green key.
The terminal will now connect to the acquirer for authorisation, if the refund is authorised then “REFUND ACCEPTED” will be shown.
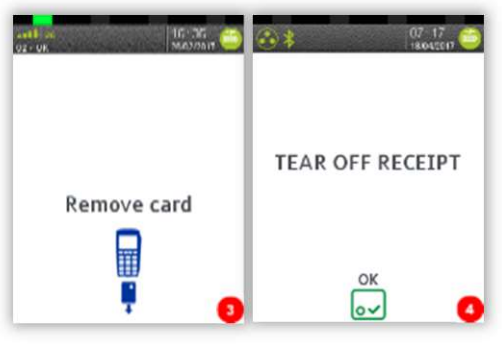
The terminal will print the merchant copy which the customer must sign. Remove the card.
Check the signature on the merchant copy with that on the card. If the signature is valid then choose “YES”, otherwise choose “NO”.
The terminal will then print the customer copy.
Transaction Receipt – (Merchant Copy – Chip and Pin Card)
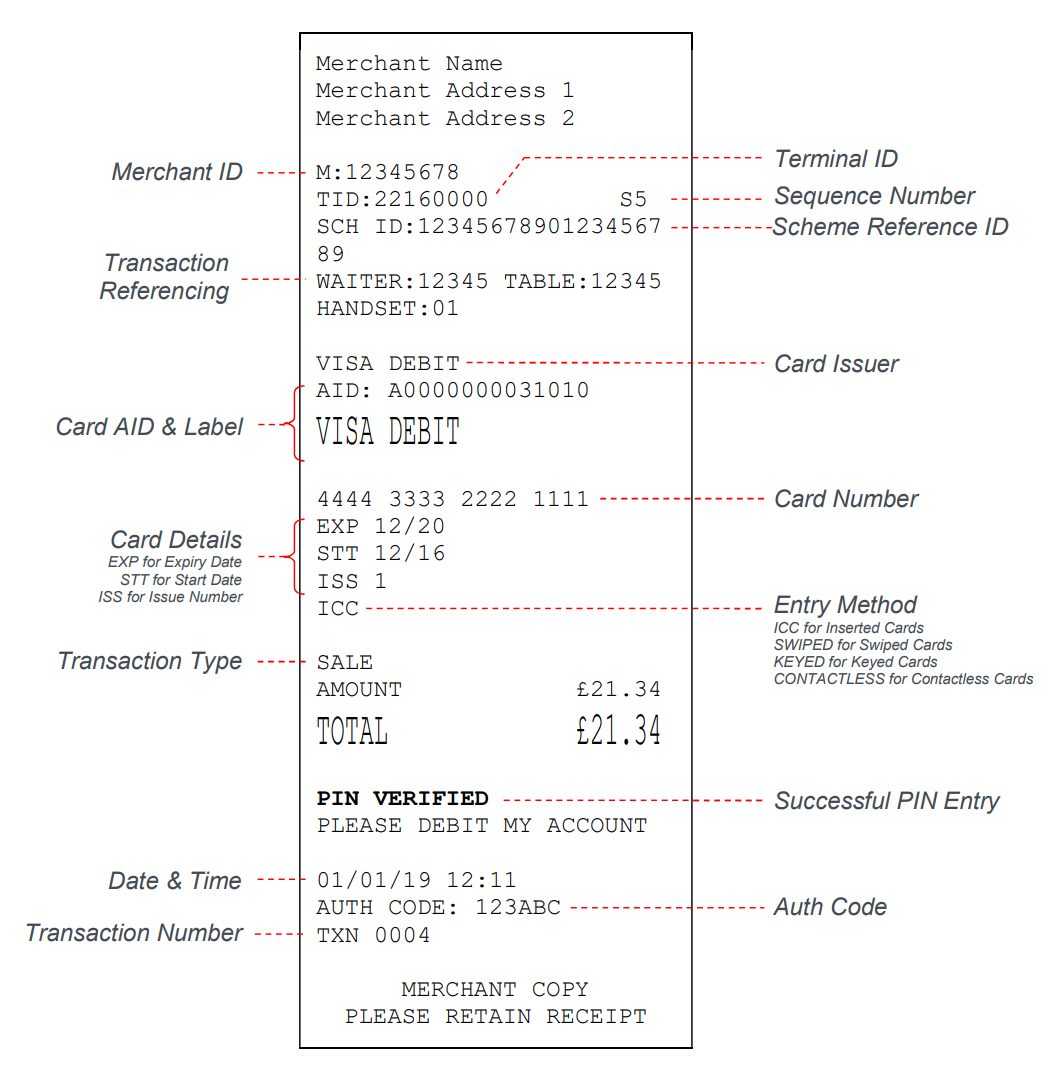
Please refer to main articles for more examples of transaction receipts.
Contactless Sale
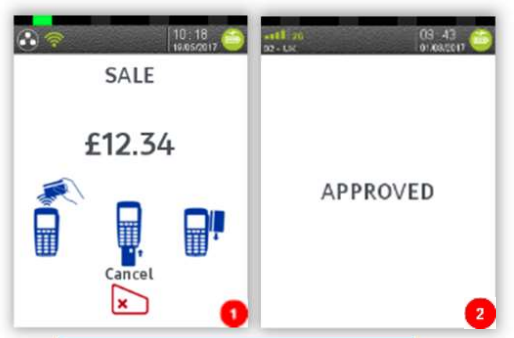
From the idle screen, enter the sale amount for the transaction and press the green key. For example enter £12.34 as 1234. If you make a mistake, press the clear key and re-enter the amount.
The cardholder should present their card/payment device against the contactless symbol on the terminal display.
The terminal will now print the merchant receipt.
Note: If the customer requests a receipt this must be done before the next transaction takes place. From the idle screen press the (F1) key to print a duplicate receipt.
Mail Order Transactions – Sale
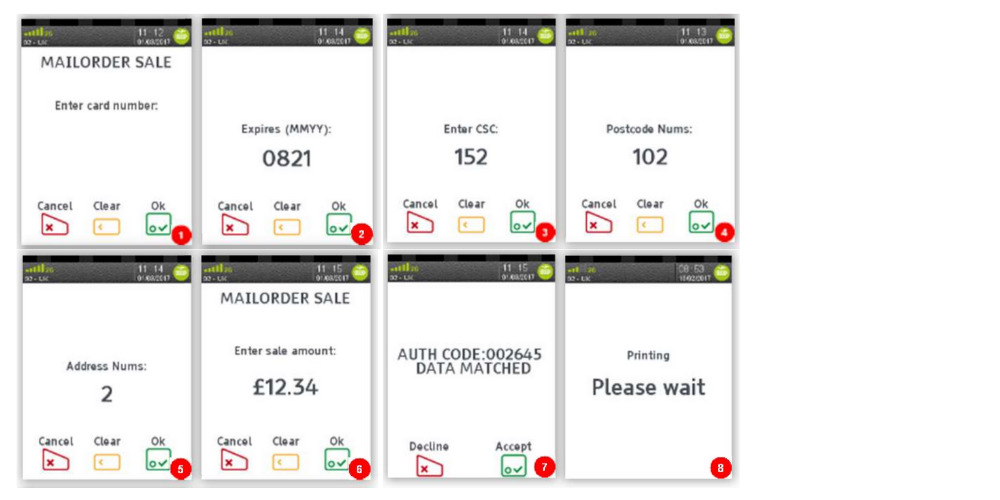
Press the menu key, then “MAILORDER”. Choose either “REFUND” or “SALE”. When prompted type in the customer’s card number and confirm by pressing the green key.
Enter the expiry date, the start date (if required), the issue number (if required), pressing green key after each entry.
Enter the card security code (CSC), the numbers from the cardholder’s postcode (e.g. GU7 1LG is 71), and the numbers from the cardholder’s address (e.g. Flat 1, 28 High Street is 128), pressing green key after each entry.
If you do not know any of these then you can press green key without entering anything to bypass the check when appropriate.
Enter the sale/refund amount and press green key.
The terminal will connect to gain authorisation and will prompt you to choose “Decline” or “Accept”, the result of the CSC/AVS check is then shown.
The terminal will print the two receipts.
End of Day Reports
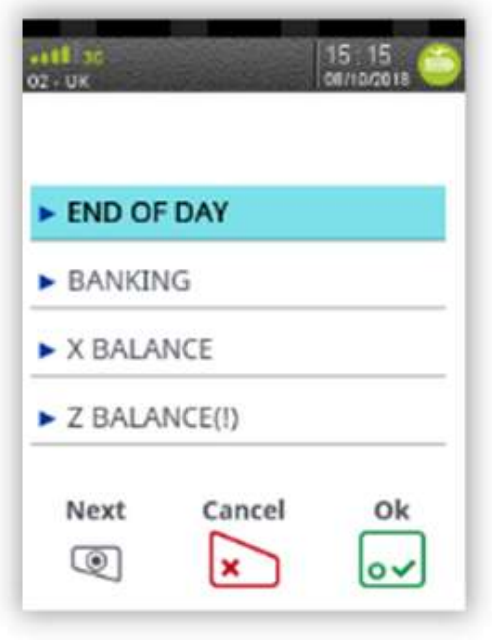
To access the reports menu press the menu key twice, then “REPORTS”. Enter the Supervisor password and press green key.
END OF DAY: One touch function that prints both the “Z REPORT” and the “BANKING” report. This MUST be done at the end of each day that you trade.
BANKING: Indicates total value of transactions that have been processed and shows that the totals have been confirmed by the acquirer.
X REPORT: Shows the breakdown of transactions in different ways enabling you to check off against individual receipts and the “BANKING” report.
Z REPORT: Exactly the same as the “X REPORT”, except that the “Z REPORT” resets the totals ready for the next day’s trade.
Changing the Thermal Paper Roll
Hold the terminal securely in one hand. With the other hand, and by using two fingers, lift the printer cover release as shown. Fully open the printer cover and remove the old roll of paper.
Unstick the end of the new roll, leaving the end free, hold the paper roll and carefully place into the printer compartment.
Holding the free end of the paper and the terminal, close the printer cover and push it firmly until it locks. While your terminal is displaying the idle screen, press and hold the paper feed key to ensure that the paper feeds correctly.
ONLY OPEN THE PRINTER COVER AS SHOWN – DO NOT FORCE THE PRINTER COVER.

Tips and Advice
REFERALS: If the terminal displays “CALL AUTH CENTRE” or “PLEASE WAIT” with a telephone number, then you must refer the transaction and phone for authorisation for that card.
PIN TRIES EXCEEDED: If the terminal displays this message then the cards PIN has been locked by the cardholder. They must contact their card issuer or use an ATM to unlock the PIN if they know the PIN.
DUPLICATES: To print a duplicate of the last transaction processed press the menu key three times, then select “DUPLICATE” and press green key.
